7 Ways to Level Up Your Sublime Text Editing
1) Packages. Control them.
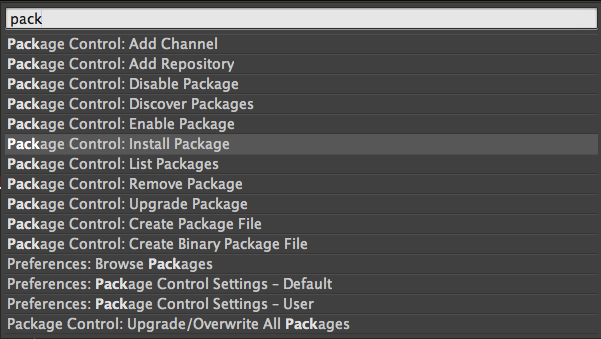
Installing PackageControl is the first step on many Sublime Text 2 (ST2) blog posts around the web. Rightly so. It opens up a new world of functionality and makes managing that world a piece o’ cake.
Once you have it installed, you’re a quick ⇧⌘P and a “pack” from everything you need.
2) Packages. Sync them.
Even with PackageControl, installing and updating packages on each of your machines is more work than it needs to be.
Instead of doing that, just move the Packages directory to your Dropbox or Google Drive and symlink it so ST2 can use it.
On OS X with Dropbox it’s as easy as this:
On your first system:
mv ~/Library/Application\ Support/Sublime\ Text\ 2/Packages \
  ~/Dropbox/appsync/Sublime\ Text\ 2/Packages
ln -s ~/Dropbox/appsync/Sublime\ Text\ 2/Packages \
  ~/Library/Application\ Support/Sublime\ Text\ 2/Packages
On subsequent systems:\
rm ~/Library/Application\ Support/Sublime\ Text\ 2/Packages
ln -s ~/Dropbox/appsync/Sublime\ Text\ 2/Packages \
  ~/Library/Application\ Support/Sublime\ Text\ 2/Packages
The really great thing about this is that ST2 stores your preferences in a package called User so all of your preferences come along for the syncing ride.
3) Speaking of preferences…
One of the first things about ST2 that made me go “ZOMG THIS IS AWESOME” is how it natively supported a handful of small features that are a PITA to get working in TextMate (my previous editor of choice) and Vim (my forever-editor-of-second-choice).
IN ST2, they’re just a boolean flag in your preferences.
Here they are, in JSON format of course:
{
  "ensure_newline_at_eof_on_save": true,
  "trim_trailing_white_space_on_save": true,
  "translate_tabs_to_spaces": true,
  "tab_size": 2,
  "rulers": [80]
}
The ensure_newline_at_eof_on_save and trim_trailing_white_space_on_save settings will save you (and others) endless headaches when collaborating via version control.
The translate_tabs_to_spaces, tab_size, and ruler settings will help keep your code readable. (more on that here)
4) Git with it
The git package is super handy to have around. It puts all the requisite git commands at your finger tips via the Command Palette.
I don’t personally use it to make commits, but where it really shines is in providing git blame and git log views in the context of the current ST2 tab.
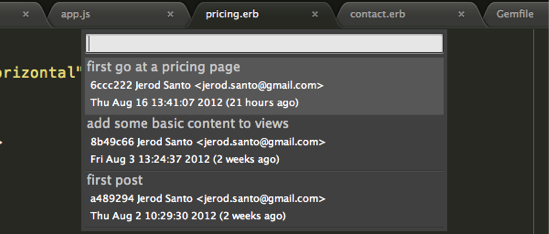
Here is the result of executing Git: Log Current File on a project’s pricing.erb file:
Selecting one of the log items from the list opens the commit details in a new tab. That’s awesome.
5) N Views to a Kill
One of my early gripes about ST2 was that it didn’t provide split views. Then I realized that I was completely wrong and it does provide split views! Don’t you love when that happens?
You can find the settings for split views in View -> Layout. There are many choices there, but all I usually need is two columns side-by-side so I’ve trained myself on two keyboard shortcuts:
- ⌘⌥2 — switch to the two column side-by-side layout
- ⌘⌥1 — switch to the default on column layout
Once you have multiple views up you can drag & drop tabs between them. You can even open the same file in multiple views, if that floats your boat.

6) Enhance the Sidebar
The SidebarEnhancements package fills such a huge void in ST2’s feature list that it should really be merged into core.
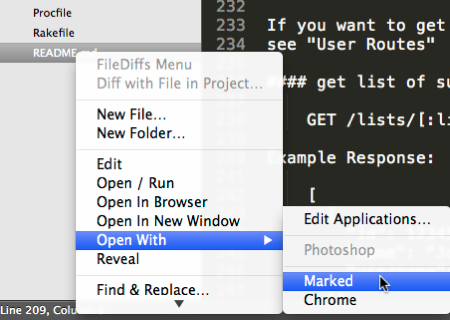
Not only does it add handy things like the abilities to “close”, “move”, “rename”, and “delete” files (how avant garde!), but you can also “open with” a managed list of external applications.
I like to preview my Markdown files in Marked, which this package enables.

If any influential ST2 people are reading this, please seriously consider getting SidebarEnhancements into ST2 proper.
7) All the small keys
The best way to level up your text editing is by removing round trips to the mouse.
In addition to supporting many of the Operating System’s shortcuts, ST2 has a plethora of keyboard shortcuts for you to master.
Here are a handful of them that I believe give you the most bang for your buck:
- ⌘T — Goto Anything. This is TextMate’s killer feature implemented flawlessly
- ⌘D — Quick add next. When you have a text string selected and you want to quickly select subsequent matching strings, this is your best friend. Once you have all the things you want selected you can operate on them as a group (edit, delete, upcase, etc.)
- ⌘L — Select the current line. Hold it down to contine to select subsequent lines
- ⇧⌘[ and ⇧⌘] — Navigate left and right through your open tabs, just like in Chrome/Safari
- ⌘K ⌘N — Fold code at indentation N
- ⌘K ⌘J — Unfold all code in the document
- ⌘K ⌘B — Toggle the sidebar. This is essential when working on a small screen and using split columns
Fin
Those are the big ones. There’s also writing your own custom snippets, but that’s a big enough conversation to warrant its own post. Subscribe to the feed or follow along on Twitter to be notified of that and other future posts!

